Bogoljubov vs Müller, Triberg 1934—
An example of how to evaluate a given position and formulate a plan of attack based on vulnerable squares. This particular game is quite instructive on the value of timing and position over decided material advantage. Black seemingly falters by ordering his Rook too far into enemy territory too soon. The question here is not only placement by also of timing. Even so, the maneuver by Black to castle Queen side and the resulting capture of a central pawn seems like a good strategy. Even the thirteenth move of the Bishop, Bg4-e6 appears to be a preparatory maneuver on the part of Black’s forces. However, the Bg4-e6 maneuver is also suggestive that Black’s forces are not nearly as coordinated as what might first appear. White will interpret the Bg4-e6 maneuver as indecision.
![]()
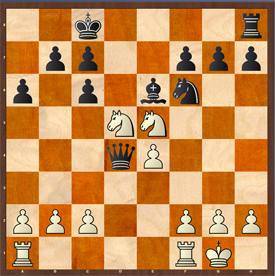
After only twelve moves, Black seems to have control of the board. Admittedly, the situation does not look promising for White. For one thing, the White Queen is under attack. Black also has massed considerably more force in the central region of the board. Already a Rook is in play in a coordinated attack supported by a Queen. Black also has a Knight and a Bishop on the field. Seemingly, from every perspective, Black has the advantage, yet that is not the case. White is on the verge of unleashing a brutal counter-offensive. Can you spot the weakness in Black’s position?

Let’s take a look. Black is decisively poised for further attacks. The Pawn on B2 is under attack by a Queen. The Pawn on E4 is attacked by a Queen, a Rook, and a Knight. The only defender of Pawn E4, a Knight, is itself under attack; further, should that Knight move, the White Queen herself would be captured. The Knight is pinned and cannot move. As for the most powerful segment of the White army, the White Queen, a protected Black Rook is immediately poised for immediate capture of the Queen. The Black Bishop also bares down on the hapless White position, preventing a Rook from occupying D1, and thereby challenging Black for control of the open central column. At best, it appears that White will be reduced to a passive defense for some time.
However, if we look on a deeper level, we discover at least two interdependent factors, both of which will influence the strategy of the battle. Let’s look first at White: two pieces in the center, one a pawn, another a Knight. The Knight, though is the most forceful, having already positioned itself in enemy territory. As for Black, we have already looked at how his pieces are positioned, but we did not include an analysis of three potentially weak squares.
Because Black has advanced both Queen and Rook immediately near the enemy Pawn flank, both Queen and Rook are vulnerable to a pawn attack on C3. Another weakness is the D7 square which is currently under control of the White Knight, thereby limiting the available moves for the Black King, should the King come under attack. The third weakness in the Black formation, is the A7-E3 Diagonal. The A7-E3 Diagonal leads to an unprotected square on the back rank. If White places a Queen on the A8 square, the battle would be over.
Bogolujobov will use threats of attack in order to compel Black to position Queen and King on squares vulnerable to a Knight fork. Müller clearly understands part of the strategy, but not all of the underlying threats. The threats by Bogolujobov, then, will be coordinated toward a deadly knight fork, entrapping both King and Queen. The ensuing battle will become a complete rout.
[2col1]
Threat on A7-E3 Diagonal
Bogolujov will first position his Queen on the important A7-E3 Diagonal. Since the Queen was under attack by the Black Rook, the maneuver will appear to be a defensive one, but it is not.

13.Qd2-e3; Bg4-e6
The board position seems reasonable without any hint of an immediate threat. Black moves his hapless Bishop a second time, almost as if there is no underlying strategy. Bogolujobov will interpret the move of the Bishop as evidence that Müller has yet to see the threat. All is calm, but a tactical Blitzkrieg is about to be unleashed.
Threat on C3
White immediately begins the attack with the objective of allowing both heavy armoured segments (Queen and Rook) to be attacked by a Pawn phalanx, a pawn fork. Black sees the danger and responds by retreating the Queen.
14.Nc3-d5; Qb4-c5
This is the wrong strategy, but Black has little choice in the matter. Capturing the Knight on D5 would prove disastrous. To do so would allow the devastating Pawn fork on C3. By moving the Queen to C5, Black seemingly reinforces the vulnerable A7-E3 Diagonal as well as protects his Rook. The battle is now lost. White now has two Knights, both centrally positioned. Black’s Queen has been reduced to a passive defensive role and the Black Rook is now pinned. White has the advantage of position and timing, Black having retreated twice, once with a Bishop, and once with a Queen.
Queen Sacrifice
White attacks the Rook, sacrificing the Queen. The sacrifice compels Black to capture the White Queen. The capture by Black, however, allows both White Knights to begin a penetrating attack against the Black King himself.
15.Qe3xd4!!; Qc5xd4
The attack by the two Knights will be so intense that the Queen will not be able to come to the defense of the King, nor will any other piece, except one lowly pawn. Black has the material advantage, but his superior force will soon be decimated in the ensuing melee.
[endcol]
[2col2]Coordinated Knight Attack
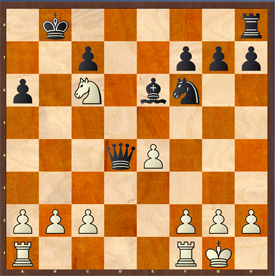
White immediately unleashes the first Knight attack: Check! The Black King must move with only two choices available: D8 or B8. The C7 square is under the control of the other White knight and therefore is not an option for Black. However, neither the D8 square, or the B8 square represent a defensible position. If D8, the Black Queen and King are on the same open column, allowing White to bring his Rook into battle. If B8, the Queen and King will be vulnerable to a vicious Knight fork, and that is exactly the attack White unleashes.
16.Nd5-e7+; Kc8-b8
Decisive Knight Fork
A Black pawn bravely captures the Knight, but in so doing permits yet a second Knight fork. White is taking massive casualties: a Queen, and now a central Knight.
17.Ne7xc6+!;b7xc6
18.Ne5xc6+
Black resigns, his army and position in shambles. White has two Rooks, one Knight and 7 Pawns with a connected pawn formation on both Queen and King sectors. The Black army has been reduced to a single Rook, a Knight, a Bishop and 5 Pawns, two of which are isolate pawns.
The battle is over. Three strategic squares and a central position Knight ceded the victory to White.
[clearcol]
If you do not see the game on this page, just reload by pressing the reload icon on your browser. That should do it. I am indebted to the suggestive comments offered by the chess afficinados who blog and analyze on chessgames.com. All mistakes and overights, of course, are mine.


