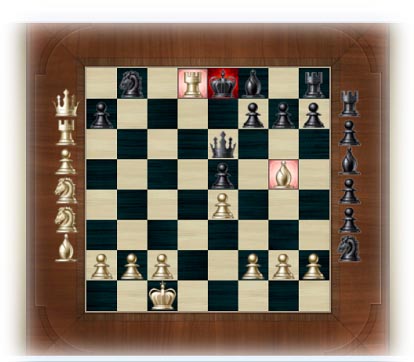
Morphy vs Duke Karl/ Count Isouard, 1858—
An example of open lines, rapid development, and massing of forces. Modern chess is played quite differently today, largely because of players such as Paul Morphy, Adolf Andeseen, and Johannes Zukertort. In this particular game, Black falters on his third move B-Kt5, a seemingly inane move intended to paralyze the knight. On the surface, the strategy and timing look plausible. However, that move eventually leads to the complete undoing of Black’s forces. Blitzkrieg will break Black’s defenses and end the game decisively.
![]()
What happened? That’s the reaction that most of us have. I still remember the first time I played through the moves on a chess board and found myself suddenly bewildered and amazed. I knew I had just seen something that I had never seen before. I’m sure that Duke Karl and Count Isouard were taken by surprise as well. But what were the strategies and tactics that Morphy followed? How did he do it?
Let’s take a look. Morphy focuses on a target. He never moves a piece without a reason. His early moves are all strategic; his later moves, all tactical. Morphy understood the basic theoretical underpinnings of chess.
If we look at chess on a deeper level, we discover an interdependence of four distinct elements: material, space, tempo, and force. In modern chess play, compensation functions as a fifth element in which a pawn or other piece is exchanged with the perceived notion that somehow the exchange provides some sense of potential advantage in position. The other elements in chess are much more tangible with material being the number of pieces, space being the number of square under control or accessible, tempo being initiative, and force being the concentration of pieces against a given square.
Morphy will use threats of attack in order to compel Black to cede space. Once Black’s defense is constricted, Morphy will amass force against a given square as well as coordinate a front assault at a different sector of Black’s defense. Black’s King Bishop and Rook never enter the fray of battle, and the Black Queen never even once threatens an enemy piece. The ensuing battle becomes a complete rout.
[2col1]Opening Maneuvers
The weakest square in Black’s fortress is the KB2 square. Until Black has castled, this square is protected only by the King. The Morphy strategy here is to mobilize his pieces quickly, open lines of attack, threaten a full attack on KB2, and prevent Black from castling.
- P-K4e4, P-K4e5
- Kt-B3N-f3, P-Q3d6
- P-Q4b4, B-Kt5Bg4
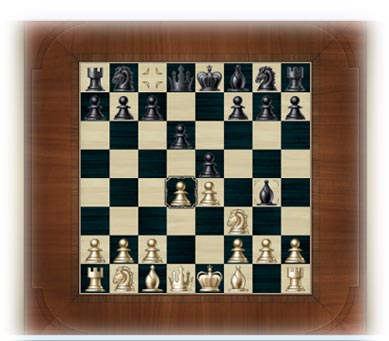
This all seems reasonable enough. Both armies have opened with P-K4 in order to secure the crucial center squares. White immediately attacks with his Knight; Black appropriately defends (Philidor Defense). White attacks the center yet a second time with his Queen pawn. Black ignores the threat, preferring to counter-attack with his Bishop, immobilizing the White Knight with a pin. If the Knight moves, the Queen is lost. All looks good, but Black is counter-attacking too soon. He simply does not have enough force or reinforcements available.
Initial Skirmishes
White immediately begins the attack with the objective of securing the crucial center (K-4 square). If the attack is successful, White will be able to control the lines of attack. Black responds by capturing the Knight.
4. PxPdxe5, BxKtBxf3
5. QxBQxf3, PxPdxe5
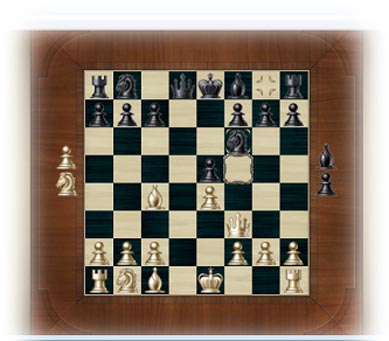
This is the wrong strategy. The vital center is under attack. Black cannot begin a counter- attack until the game has equalized. Since White has the first move, White has the initiative. By attacking as he does, Black moves his Bishop a second time, allowing White to recapture with a developing move with a major attacking force, the Queen. Black now recaptures the Pawn, equalizing the crucial center, or so he may think. Yet, when the skirmish is over, what we see is that the field of battle has changed dramatically. Black now has no defending forces on the open field. White, on the other hand, bears down with the full might of a Queen on Black most vulnerable square, KB-2. Furthermore, the exchange has now opened the diagonal to KB-2, allowing an attack from the left flank.
Flank Maneuver
White releases his Bishop, again attacking the vulnerable K-B2 square. Black responds by a partial blockade by developing his Knight to K-B3. This may look plausible, but let’s look a little deeper.
6. B-B4Bc4, Kt-B3Nf6
The K-B2 is under attack with a preponderance of force. The K-B2 square is still protected only by the King. White has mustered two long range weapons with a combined force of 12 units, the Queen being 9 units; the Bishop, 3 units. Black has blockaded by developing a close-range weapon with a force of 3 units. In a congested battle, the Knight is the best choice, but against a Bishop on an open board, the Knight is at a decisive disadvantage. Black has 3 units; White has 12 units. White has both position and preponderance of force.
Flank Reinforcement
White immediately moves his forces to the left flank, focusing the attack again on the vulnerable K-B2 square. Black responds by developing his Queen, seemingly achieving some degree of equality. The battleground now has Queen and Bishop facing Queen and Knight. Both armies have12 units each on the field. There is a crucial difference, though. The White army is able to maneuver its forces and marshal additional reinforcements. The Black army is committed to an awkward defense. White has a double-attack here: K-KB2, and QKt-2. Black, of course, cannot defend both points. White ignores the lowly pawn on QKt-2 and prepares to field more forces.
7. Q-QKt3Qb3, Q-K2Qe7
Developing Moves
White immediately brings up reinforcements for the attack, Kt-B3. Black, however, marshals a pawn in preparation of a pawn counter-attack on the left flank: P-B3. White now has 15 units on the field; Black 12 units. Black is maneuvering for a pawn attack; White, on the other hand, is preparing to unleash his Rooks, a major maneuver.
8. Kt-B3Nc3, P-B3c6
Black Counter-Attack
White develops a fourth piece, pinning the Black Knight: B-B4. Black seemingly ignores the threat and attacks with light armour on the left flank: P-Kt4. White now has 18 units on the field; Black 12 units.
9. B-KKt5Bg5, P-QKt4b5
[2col2]White Attack, Initial Phase
The Black counter-attack is crushed with an overwhelming force. White has a preponderance of force and immediately attacks on the left flank. This time, though, the target is the King himself, not the K-B2 square. Because the Black Knight is pinned, that force is paralyzed. The light armour units are quickly destroyed, resulting in an immediate threat to the King from a long range weapon, the White Bishop. Black must defend or surrender. The second Black Knight comes into play, but like its counter-part on the right flank, this Knight is also pinned.
10. KtxPNxb5, PxKtcxb5
11. B-Kt5Bxb5+ Check! Kt-Q2Nbd7
Rook Manuever, Massing of Force
White castles, bringing his King into safety while simultaneously attacking the Knight with the force of a Rook (5 units)! Black responds by bringing his own Rook into the fray. The difference, though is that the Black Rook is defending the Knight and therefore, is restricted to a passive role.
12. O-O-OO-O-O, R-Q1Rd8
Tactical Blitzkrieg
White captures the Knight; Black responds by capturing with the Rook. White now attacks a second time with a second Rook. Black’s reinforcements (Bishop and Rook) are prevented from defending against the attack. Black moves his Queen in a effort to release the pin on the Kt, thereby adding a third defender to the Rook. Black seeks to exchange Queens thereby reducing White preponderance of force on the field and exchanging a passive piece for an active one. White, however, refuses to be distracted.
13. RxKtRxd7, RxRRxd7
14. R-Q1R-d1, Q-K3Qe6
Black Defense Breached
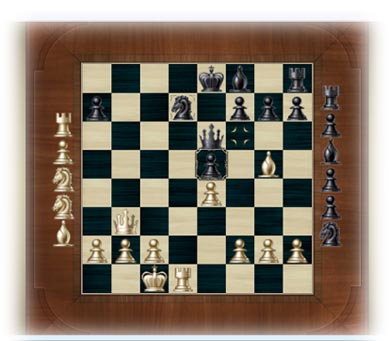
White breaches the defense by unleashing the Bishop against the hapless Rook. Check! Black has no choice. He must respond. The Black Knight finally comes into play, capturing a Bishop! For the moment, the attack seems to be over. Once Black develops, he will have superior force.
15. BxRBxd7+ Check! KtxBNxd7
Second Barrage, Frontal Assault
But the attack is not over. White sends the Queen into the attack. Check! Black cannot move the King, Black cannot interpose a piece against the attack. The Black Knight once again captures a major piece, first a Bishop, now an enemy Queen! But in capturing the Queen, the Knight left the crucial center square unguarded. The right center now becomes vulnerable for attack.
16. Q-Kt1Qb8+ Check! KtxQNxb8
Victory on the Eight Rank
The second White Rook is unleashed with full fury, ending both battle and war. Checkmate! Rapid development, open lines, preponderance of brute force, unrelenting attack— these were the motifs of attack. Black’s initial counter-attack ultimately led to a resounding defeat. White was unrelenting in his attack.
17. R-Q8Rd8#, Checkmate!
The moves of a chess game are recorded in different formats or notation systems. The Descriptive Notation, sometimes called the English Notation, allows analysis based on board symmetry as well as piece identification. Since the 1970’s, though, Algebraic Notation has emerged as the standard system with each square being identified by a alphabetic and numeric sequence of rank and file. By that I mean, each square is identified by a letter and a number. Algebraic notation is much like plotting points on a graph. In our analysis we use both Descriptive and Algebraic notation formats. The emphasis, though, is clearly on the Descriptive Notation since this format makes it easier to discuss what is happening in a series of moves. Algebraic Notation, however, is retained as a supra entry for those readers who may not be familiar with Descriptive Notation format. International chess generally follows the ICCF numeric, yet another notation system. Forysyth-Edwards notation is sometimes used to set up a given position on the board. PGN, a variant of Algebraic Notation, is often used with Java script.
